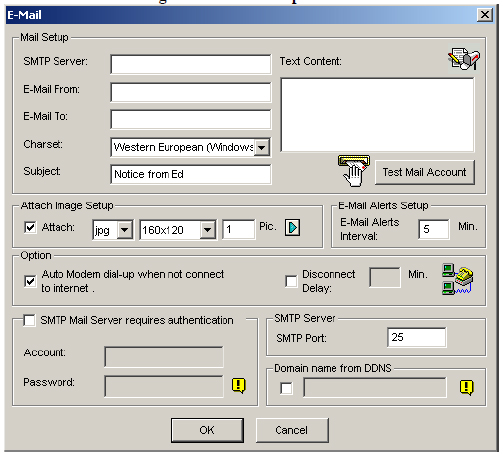
GeoVision E-mail Notification (E-mail account setup)
for GeoVision
Back to GeoVision Support | Support Home
E-mail Account Setup
1. In Multicam, click on the "Configure" icon.
2. Select "General Setting" -> "E-Mail Setup".

3. Enter SMTP Server address. "SMTP Server" has to be provided by Internet Service Provider. It usually has the format of smtp.mail.com.
4. Enter e-mail address in which e-mail alerts will be sent from. "E-Mail From" will appear as the sender when the e-mail is received.
5. Enter e-mail address of recipients in "E-Mail To". (For multiple recipients, add a coma between each e-mail address)
6. Enter subject of e-mail alert.
7. Enter customized e-mail contents in "Text Content".
8. Click on "Test Mail Account" icon to send out a test e-mail to see whether setup is correct.
9. "Attached Image Setup" will include up to 6 snapshots in the e-mail alert.
10. "E-Mail Alerts Interval" will prevent repeated e-mail alerts to be sent in the defined time interval.
11. Some SMTP Mail Server requires authentication. Please consult with the Internet Service Provider to find out if they require authentication.
12. Default SMTP port is 25, which is common for most SMTP servers. However, webmail providers such as Yahoo and Hotmail generally use different SMTP port. Check with e-mail provider for SMTP port number.
13. Click "OK". - For detailed instruction, refer to p.33 of v8.3 User Manual
For detailed instruction, refer to p.33 of v8.3 User Manual
Back to GeoVision Support | Support Home
E-mail Account Setup
1. In Multicam, click on the "Configure" icon.
2. Select "General Setting" -> "E-Mail Setup".

3. Enter SMTP Server address. "SMTP Server" has to be provided by Internet Service Provider. It usually has the format of smtp.mail.com.
4. Enter e-mail address in which e-mail alerts will be sent from. "E-Mail From" will appear as the sender when the e-mail is received.
5. Enter e-mail address of recipients in "E-Mail To". (For multiple recipients, add a coma between each e-mail address)
6. Enter subject of e-mail alert.
7. Enter customized e-mail contents in "Text Content".
8. Click on "Test Mail Account" icon to send out a test e-mail to see whether setup is correct.
9. "Attached Image Setup" will include up to 6 snapshots in the e-mail alert.
10. "E-Mail Alerts Interval" will prevent repeated e-mail alerts to be sent in the defined time interval.
11. Some SMTP Mail Server requires authentication. Please consult with the Internet Service Provider to find out if they require authentication.
12. Default SMTP port is 25, which is common for most SMTP servers. However, webmail providers such as Yahoo and Hotmail generally use different SMTP port. Check with e-mail provider for SMTP port number.
13. Click "OK". - For detailed instruction, refer to p.33 of v8.3 User Manual
For detailed instruction, refer to p.33 of v8.3 User Manual


