iMaxCamPro (Bronze, Gold, Platinum) Setting Up a PTZ (remotely)
iMaxCamPro Setting up a PTZ (remotely)
Bronze, Gold, and Platinum iMaxCamPro DVR's
Back to iMaxCamPro Support | Support Home
Step 1
Login to your DVR system through the PSS client software using your user name and password. Default administrative login is “admin/admin”.
Step 2
Once in the software, log in to the desired device under your “Device List” by right clicking and selecting “Login”.
Step 3
Before setting anything, make sure that your connections with your PTZ are made to the DVR properly and it’s receiving power. Note: Refer to your PTZ and DVR manual to check if all wiring is correct. *Change the settings to how you want the PTZ to function.

Step 4
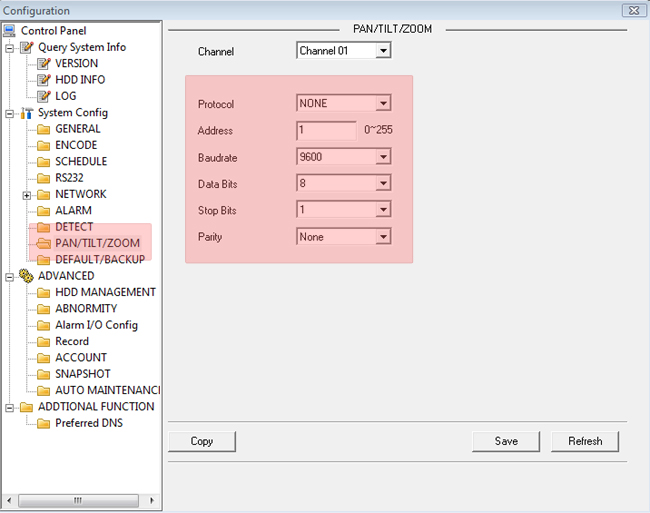
Proceed with right clicking the device again and choose “Advanced Device Config”. This will open the unit’s configuration menu. Select the “PAN/TILT/ZOOM” folder under the “System Config” tree. First assign a channel to where the PTZ is located on the DVR. Now select the protocol the PTZ uses (Note: most current PTZs use the PELCO family of protocols). Set the baud rate to the rate that the PTZ should be at (again check the manual). For the address field, enter in the address you physically set that specific PTZ up to (Note: if you have more than one PTZ, you must set the address on each PTZ differently). The rest of the settings, data bits, stop bits, and parity.
Once completed, click on “Save” at the bottom and you should now be able to control your PTZ. If you don’t get any response, restart the DVR to be sure the changes stuck.
Bronze, Gold, and Platinum iMaxCamPro DVR's
Back to iMaxCamPro Support | Support Home
Step 1
Login to your DVR system through the PSS client software using your user name and password. Default administrative login is “admin/admin”.
Step 2
Once in the software, log in to the desired device under your “Device List” by right clicking and selecting “Login”.
Step 3
Before setting anything, make sure that your connections with your PTZ are made to the DVR properly and it’s receiving power. Note: Refer to your PTZ and DVR manual to check if all wiring is correct. *Change the settings to how you want the PTZ to function.

Step 4
Proceed with right clicking the device again and choose “Advanced Device Config”. This will open the unit’s configuration menu. Select the “PAN/TILT/ZOOM” folder under the “System Config” tree. First assign a channel to where the PTZ is located on the DVR. Now select the protocol the PTZ uses (Note: most current PTZs use the PELCO family of protocols). Set the baud rate to the rate that the PTZ should be at (again check the manual). For the address field, enter in the address you physically set that specific PTZ up to (Note: if you have more than one PTZ, you must set the address on each PTZ differently). The rest of the settings, data bits, stop bits, and parity.
Once completed, click on “Save” at the bottom and you should now be able to control your PTZ. If you don’t get any response, restart the DVR to be sure the changes stuck.


